Well, where to start? I claim no expertise in such matters, but I offer the benefits of my experience so far.....
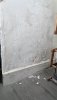
Firstly it is not "rising" damp, it is penetrating damp. Yes, it looks like it is "rising" as it travels up your internal walls via the mortar and plaster due to capillary action. I feel I have to point this out as some totally unqualified "surveyor" (i.e. salesman) will try to sell you all sorts of snake oil treatments to "cure" your "rising" damp at massive cost and to no avail. Rising damp is a catch-all phrase intended to scare the bejaysus out of you into taking all sorts of unnecessary and costly precipitate actions
What stands out from what I can see on your photos is that there is no visible DPC. Assuming that the house is not so old that it was built without a DPC, in which case retro-fitting by injection/cream/rods etc is definitely worth considering - do some research before committing to anything. Since the door appears to be at about the same level as the path I guess that a new path has been laid at some point and has raised the external ground level above the DPC. There should be at least two full brick courses between the DPC and ground level. If this is the case then you have no option but to lower the ground level outside your property. That is problem no.1 and unless addressed there is no point going any further.
The pointing on the brickwork looks old and damaged - another possible cause of ingress, which may lead to rusting and damaged wall ties. Another route I found was that the sealant around the door frame was compromised; although it looked OK, there were a few places where there was inadequate adhesion to either the door frame or the brickwork - especially so if the pointing is flaky.
It may well be worth checking that neither the DPC nor the cavity (I am assuming it is a cavity wall) itself is bridged - the only way to do this is to remove a couple of bricks at a time. My cavity was well and truly bridged with soil, building rubble, chunks of mortar from construction ("snots") and debris from various works carried out over the years; this was to a height of three or four courses above the DPC and needed removing by hand as far as possible below the DPC, again two courses or more. If you have cavity wall insulation you are doubly screwed as this will assist in damp migration across the cavity and harbour damp indefinitely due to blocking off of air circulation through the cavity. I had mine removed at a far greater cost than installing it in the first place. A further problem I had was that the upper half of the house is rendered, and the rendering is riddled with micro-cracks (and some not so micro) allowing moisture ingress, which migrated across the cavity due to the horrible CWI.
It looks like the electricity supply in to your house is via the cable which seems to enter through the bricks, which does appear to be a bit of a bodge, unless there is some kind of drip loop or drip nose on the cable itself - might be worth getting a sparky or your electricity company to see if this arrangement can be improved. I doubt whether this cable would have been installed at or below ground level, which is another reason to suspect a raised path level.
I can't make out from the photos whether the internal floor is concrete or wood. If it is a wooden floor there should be a crawl space underneath. If there is no access in the form of cut floorboards as a type of hatch you could remove some floor boards to gain access. This would allow you to see what is happening below ground level - is there a DPC, are floor boards and/or joists damp and rotten?
If a concrete floor, well I found that the concrete wasn't thick enough, and the DPC was one course below the concrete, so the DPC was bridged by damp soil; after some digging down I am considering trying to back up the DPC with cream or rods and then backfilling with a thicker concrete layer where the floor meets the walls.
The main thing is not to rush into trying to fill or seal anything until you are 100% sure of the cause(s) of the damp. Once you know what the actual problem is, there is plenty of guidance on forums such as this one on the way forward.
Good luck!

 132.7 KB Views: 115
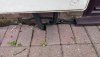 260 KB Views: 117
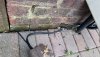 294.5 KB Views: 105
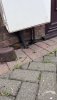 226.4 KB Views: 119