In the workshop at last.

Joined
Jul 29, 2018
Messages
800
Reaction score
531
Location
Huddersfield. UK.
Country
United Kingdom
Hi,

I finally wandered into the workshop this morning without a care in the world. I've spent months grafting in the gardens but have finally caught up so perhaps after 20 years of being retired I might manage to do something I want to do; not something I've got to do.

I've been playing with my toys and enjoyed myself machining a bit of hardwood using the saw bench and thickness planer. Now winter is upon us and it keeps raining I'll enjoy pottering around.

Kind regards, Colin.

Wood machining_0001.JPG


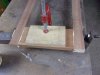
Ripping on the sawbench.

Wood machining_0002.JPG


Dewalt 12" thicknesser doing what it's good at; I really need to add extraction but space is very limited so it's a case of wearing a mask and ear defenders. Cleaning up isn't a big issue.

Wood machining_0003.JPG


Machined ready to use; I enjoyed doing this.

Wood machining_0004.JPG


My home made saw bench; 4HP single phase no soft start so not a saw for a novice to play with it won't take prisoners. It's just rise and fall which is all I need with a 4" depth of cut. Please note substantial 2" square tube fence; this is rock solid and very accurate giving about 18" ripping capacity. The blade has a permanent riving knife installed which rises and falls with the blade whilst allowing rebating etc seen in top picture.

Wood machining_0005.JPG


Planing sure is a messy job without extraction but is easily cleaned away with a brush and dust pan. I also have an 8" planer/thicknesser for the smaller sections.
Just passing a bit of time because dinner is imminent.
 
Joined
Jul 11, 2020
Messages
92
Reaction score
41
Location
Yarm, UK
Country
United Kingdom
I sat my planer thicknesser on a stand not unlike that one peeking in on the bottom picture and on braked wheels so that it pushes out of the way when not needed. Then I bought a Scheppach 'suitcase' extractor which I connected with a stepped adaptor. If I am working a lot of timber in one session, then I substitute a drum type wet and dry vac via the same adaptor. Even my bench saw is attached to the same extractors if/when needed. All my machines and benches are on wheels as I don't have a lot of space at the moment.

Like you, all my 'must do' jobs are out of the way this year and now I can get on using all my aged oak and rosewood. To extend the workspace, I have bought a heavy weight pop up gazebo to position just outside the garage. The legs locate onto studs I have in the ground and are held down by cast iron weights. So far, it has helped in bad weather this year to complete jobs.

This is the one: https://rockawnings.co.uk/gazebos/rhino-hex-45

Mine has all 4 sides if required and they are simple to add/remove. To put it up, including sides takes about 10 to 15 minutes.

I may be going into hospital again to correct my botched knee replacement in the next few months, so need to clear a few projects soon.

T'other Colin
 
Last edited:
Joined
Jul 29, 2018
Messages
800
Reaction score
531
Location
Huddersfield. UK.
Country
United Kingdom
Hi,

Thanks Colin. I too have machines on castors making life easier. Many years ago when I had my big 3 phase machinery I made a big 3 phase dust/chip extractor; this was designed around an old galvanized water cistern tank and would collect four big bin bags before needing emptying; when I sold the big machines I didn't need the big extractor any longer so disposed of it just retaining the top quality Brook motor. I now have a Record Power extractor but at the moment don't couple it to any of my machines; having carried out all the big heavy jobs I don't create as much mess these days so just tidy up with sweeping brush then hand brush and dustpan which get a lot of use; I also go around with the dust extractor hose so the workshop is always clean and tidy; twice yearly I fully open the workshop doors and wearing a dust mask I use the compressor air gun to really blast all the dust and debris onto the driveway where I can quickly sweep it up; I can't stand my workshop being untidy.

Good idea to use the gazebo extending your working space; it will be especially handy allowing you to handle long material you'd struggle with inside the garage; your weather will be like our weather and is the reason you need to weight the gazebo down.

Good luck Colin if you do go into the hospital for the knee operation; we have best friends a retired couple who have had a knee replacement each and aged 80 they enjoy 6 mile walks on a regular basis; I hope all goes as well for you. In 1970 I had my left knee cap removed following a road accident so now only have one knee cap but the surgeon did a top job and I don't even notice it.

I've already done the shopping and just enjoyed a mug of tea so now for some quality workshop time before yet another day slips quietly by.

Kind regards, Colin.
 
Joined
Jul 11, 2020
Messages
92
Reaction score
41
Location
Yarm, UK
Country
United Kingdom
The knee has already been replaced, and we suspect that has failed. I have just returned from having an x-ray taken of it. From what I could see, it has definitely failed and will require what they term a 'revision'. That is, take the old one out and put a new one in. Same long recovery and physio all over again!

Colin
 
Joined
Jul 29, 2018
Messages
800
Reaction score
531
Location
Huddersfield. UK.
Country
United Kingdom
Hi,

I'm sorry to hear this Colin; going through a knee replacement the first time is well worth it but not if it subsequently fails as yours has; you'll know what to expect the second time round and not be looking forward to it; on the positive side though there are thousands delighted with their knee replacement having experienced little trouble once their new knee settled down. Good luck if you do need the replacement; in the meantime make the most of your workshop.

Kind regards, Colin.
 
Joined
Jul 29, 2018
Messages
800
Reaction score
531
Location
Huddersfield. UK.
Country
United Kingdom
Hi,

I'm enjoying pottering in the workshop but it feels strange after spending so much time in the garden. I'm having to reacquaint myself with my tools and kit but I'm slowly getting there.

Two years ago I designed; made and installed a new wooden porch to our bungalow front door. I took great care with everything especially waterproofing; the first year it was absolutely perfect and what a difference it made to comfort and keeping out our terrible climate. This year however after the porch has endured monsoon and horizontal rain driven by high winds coming up the valley the porch has started to leak; only about an egg cup full of water at a time but enough to really annoy after all the time and effort I'd put in.

I've spent ages trying to find where the water is gaining access but everything still looks OK and the paintwork is good. The design includes a bottom ply panel to each side of the door; wooden beading is used planted inside and out to retain the panels secured with ss screws; the ply is WBP (water boil proof) this ply however is modern rubbish and one of the panel faces has started to delaminate; I've ensured there was plenty of paint in place and intended to replace both ply panels next year but I've had to bring this forward hence I wanted to sort the problem once and for all. I used mortice and tenon joints throughout; gluing and wedging; my plan now is to make these two new panels as face panels to cover all the lower joints and wayward ply thereby eliminating all suspect entry points. I'm awaiting delivery of marine ply but in the meantime have started to make the panel frames.

I'm not in a hurry and I'm going to town with these panels; the frames are hardwood so no knots to bother me; the hardwood I've had for years so know it's well seasoned. Not just mortice and tenon joints this time but fully haunched mortice and tenons which I've glued using Titebond Premium exterior adhesive; I cramped the glued panels yesterday in my home made extra heavy duty sash cramps and this morning having let the adhesive set overnight I've removed the cramps and then power sanded both frames; at the moment the frames are just basic but well constructed frames with no chance of water getting through the joints; tomorrow I'll use the router to add the moulding detail to the panel fronts and once the 9mm thick marine ply arrives I'll run the rebates to the back of the frames; I'm going to Titebond the ply to the frames and also screw it; I'm sick of this climate undoing and attacking every outside job I do so as usual I'm fighting back.

http://www.titebond.com/product/glues/2ef3e95d-48d2-43bc-8e1b-217a38930fa2

I'm also considering giving the new marine ply a full coat of Titebond to seal the surface before painting; the paint I use is very expensive Benjamin Moore making it even more annoying for me; the paint hasn't failed but the WBP has failed.

I don't care how long this job takes; the new panels will be fully painted back; front and all edges whilst in the workshop; SS wood screws will be used to secure the panels and the screws sunk allowing wooden plugs to be added; I dislike using filler; our climate attacks anything. This job will rumble on but as I say I'm not in a hurry; I did my absolute best in installing the porch but not good enough so this time I'll do better than my best; plan "B" is to be first to invent a working force field right over our site?

Kind regards, Colin.

Porch problems (1).JPG


Modern WBP ply failing after receiving at least three coats of top quality paint; just this panel but so downright annoying.

Making frames._0006.JPG


Using Record Power RPM75 to sink the mortices. A very basic but useable cast iron machine. Seldom used machine but it comes into its own for this kind of project; I also have a selection of routers but this cuts square holes saving time.

Making frames._0008.JPG


Home made very accurate tenoning jig riding on home made 4hp saw bench. I made this jig for use when I made the porch so it has been worth the time and effort to make it. The sawbench is basic rise and fall but powerful on single phase 240V with double belt drive.

Making frames._0009.JPG


Please note handle on jig for safety. The jig is tight on the saw fence ensuring accurate cheek cuts.

Porch frames_0002.JPG


The square chisel needs sharpening but I cleaned the joints using a sharp wood chisel; I've now got time so the chisel will be sharpened before being put away. The last time I used it I was as usual under a lot of pressure to beat our dire climate.

Porch frames_0003.JPG


Tenons cut ready for final fitting; I cut slightly oversize then trim for a good fit. It takes time but is worth it.

Porch frames_0001.JPG


Heavy home made sash cramps in use with a glued panel in place; please note central cramps; if these aren't used it's highly possible to "spring" the frame; these ensure the frame frames flat. Titebond glue used seen in picture. I added lots of glue so the joints won't end up glue starved.

Porch frames_0001_01.JPG


The basic frames ready for routing; I decided to make basic frames and glue them before routing saving lots of hassle and time with the joints; I can run the big router round adding rebates for the ply panel only needing the corners squaring; I can't route the rebates until the ply arrives because I want a perfect flush fitting ply panel; all this is long winded but I mean to win in the end however long it takes; in the meantime I'm enjoying my workshop time.

Stanley 92_0002.JPG


Here's my much loved Stanley 92 shoulder plane; this was a lovely present from my late mother in law shortly after I married; I'll always treasure it and it's done a lot of work over the years.
 

Attachments

Last edited:
Joined
Jul 29, 2018
Messages
800
Reaction score
531
Location
Huddersfield. UK.
Country
United Kingdom
Hi,

More progress on the panels; the routing has been completed and this morning I decided to seal the front of the ply panels with Titebond Premium; this afternoon I've sanded then applied a primer coat all around of Benjamin Moore water based paint. Tomorrow I'll apply the first colour coat of Benjamin Moore paint. I'm ensuring every bit of the frames and panels are fully painted before I install them; given the slightest chance the horizontal rain will find a way in.

Kind regards, Colin.

Porch panels_0001_01.JPG


Plywood sealed with a coat of Titebond Premium adhesive applied with a plastic card.

Porch panels_0002.JPG


Routing for the ply panels.

Porch panels_0002_01.JPG


Benjamin Moore primer applied it can dry overnight.

Porch panels_0005.JPG


I mean these panels to remain in place and be fully Yorkshire climate proof; lots of Titebond waterproof adhesive and lots of wood screws.

Porch panels_0006.JPG


The panel fronts; it seemed to take forever doing the routing.

Porch panels_0007.JPG


The backs secured ready for finishing; even the backs will be fully painted before installation; I don't want to do this job a second time.
 
Joined
Jul 29, 2018
Messages
800
Reaction score
531
Location
Huddersfield. UK.
Country
United Kingdom
Hi,

An update as the project has moved on a bit in between the rain.

Both panels have been completely sealed with three coats of paint and at last this morning it was dry enough to dash out early and install them.

With winter upon us I didn't want to hang around; ideally I'd have screwed the panels using countersunk screws then made good with waterproof filler before painting but for once I compromised and used screw head lidded plastic caps as seen in the pictures; 50mm long stainless steel wood screws are used and by doing it this way I can easily make a better job of appearance next year in warmer drier weather. Next job is to make the wooden base to cover the end of the concrete slab which I've undercoated and glossed to seal it in readiness. I'm very disappointed indeed with the original WBP plywood but this is now fully covered by the new marine plywood framed panels; weather proofing is more important then appearance but I preferred the original design; lets see water get through this lot.

Kind regards, Colin.

Porch_0001.JPG


Both new panels fully installed covering all the joints and original ply panels. I had bought two cartridges of top quality waterproof adhesive as recommended but what a downright pain this was to apply; I simply wasn't strong enough to operate the cartridge gun in fact I expected the gun to break given the amount of force required to get the adhesive to appear; I really did struggle with the first panel applying the adhesive to its rear but the second panel I'd had enough of the cartridge gun; I returned the second panel into the workshop with the adhesive; I completely cut away the end of the cartridge and used a scraper to scoop out adhesive and apply it the back of the frame. I'll never use this adhesive again; I've fallen out with it.

Porch_0002.JPG


Acrylic sealant was applied using the same cartridge gun this time the sealant flowing as it should and a wetted finger run around to smooth it as seen. The front of the concrete floor block is now fully sealed with paint; I used Benjamin Moore water based primer then went over with Little Greene oil based gloss which I had to hand; This concrete is to receive a painted wooden overcoat to finish the job for this year; I think I've got the panels on just in time it's come over very dark as I type looking like more rain.

Porch_0003.JPG


Having fully covered the original ply panels this created a sealed cavity so I decided I'd had enough of water and didn't want to trap any so have added two ventilators; these are 50mm diameter requiring a 35mm dia hole; these will ensure ventilation into the cavities; I'm determined to beat our dire climate and make this porch horizontal rain proof. Only an egg cup full of water getting is is totally unacceptable to me. OK rain do your best you won't beat me.
 
  • Like
Reactions: Ian
Joined
Jul 11, 2020
Messages
92
Reaction score
41
Location
Yarm, UK
Country
United Kingdom
The strong adhesive I use currently is Everbuild 'Pink Grip' from Screwfix that is solvent-free and a VERY strong adhesive. It is a grab adhesive that reaches full cure in 24 hours. I recently used it attaching boards to planter for next year's veg. It has survived a full wet season this year on a planter I built last year in April.

Most important is that the nozzle is wide and the adhesive flows freely.

Colin
 
Joined
Jul 29, 2018
Messages
800
Reaction score
531
Location
Huddersfield. UK.
Country
United Kingdom
Hi,

Thanks Colin for the information. The adhesive/sealant I used is Geocel The Works Multi Use and paid £14.99 for 2 cartridges.

I didn't want a very wide bead so cut the nozzle for a small opening; even by cutting a much larger opening the sealant didn't want to come out of the cartridge; when I cut the end of the cartridge off the sealant was very thick indeed as I scooped it out with the scraper; I'll never use this Geocell again; when I go into the workshop I'll check to see if the cartridges have a use by date?

All I needed was a thin layer of adhesive not a pad; not the desired result but I live and learn. I'm unhappy with the plastic screw covers too but I'm forced to work against our dire climate; it didn't rain after all yesterday but today is another black hole; cold and looking like rain.

It's pointless moaning so I work around the problems; my main problem is the weather for outside jobs it's so unpredictable living near The Pennines; it can be a beautiful sunny summer's day but can change rapidly into a downpour of rain; you'll know exactly what it's like Colin with similar weather at your location; great fun isn't it?

I'll enjoy today though doing a bit of wood machining and I'm looking forward to some quality workshop time over the next months; I bought a Makita palm router to play with and expect delivery soon; my big Makita 3 hp router and my other routers are an overkill for small routing jobs; I'm a tool junkie and not scared to admit it. ;)

Kind regards, Colin.
 
Joined
Jul 29, 2018
Messages
800
Reaction score
531
Location
Huddersfield. UK.
Country
United Kingdom
Hi,

I've made the new porch sill but the dire weather is preventing it being installed; rain and after a brief lull more rain it's also turned colder. GRRRRR. It's nice though to play with my toys again.

Kind regards, Colin.

Porch sill_0001.JPG


The bespoke wooden sill; I had some thick pitch pine to hand so used this; I'll fully paint it to seal it and screws with wooden plugs will secure it in position; if only it would dry for a few days outside to allow me to finish the job but I can dream on.

Porch sill_0002.JPG


This is the end profile; it's surprising how much time it took just to make this measuring five times before cutting. The angle was cut on the bandsaw with its tilting table then run over the jointer to tidy the cut.

Porch sill_0003.JPG


Drip groove cut using the saw bench. The workshop always smells lovely after machining timber. I need to check for fit before painting it but I'll have to wait until the rain lets up.
 
Joined
Jul 29, 2018
Messages
800
Reaction score
531
Location
Huddersfield. UK.
Country
United Kingdom
Hi,

I've suffered the rain enough. In between rain this morning the sun actually dared show its face at around 11:30. This porch job has dragged on to now become boring so in my heavy outdoor clothing I wandered down to the workshop; gathered the new cill and sealant etc and set about installing the cill; with a bead of sealant run less than a foot long the rain joined me; oh how I love rain.

I had bought two cartridges of the Geocel adhesive/sealant; the first cartridge I disliked with a passion not being strong enough to get the sealant out of the cartridge without cutting the cartridge end off. Once again I tried the Geocell but this time although it was still hard work operating the cartridge gun I succeeded; this Geocell can be used under water which is perfect because I generally work underwater living here in Yorkshire.

The cill is finally installed much to my relief; it needs finishing off; regarding sealing the ends and plugging the screw holes which I hope to do later this week assuming the Met Office forecast is correct. A lick of paint should see it finished. I did the job just right side of panic; the rain once again was soaking everything as I dashed back to the workshop; it's another wet miserable black hole and the wind has been trying to remove our bungalow from the valley side. First job this morning was to check the bungalow roof was still in place and the trees still standing; what a night last night with ferocious weather but it's not unusual here on the valley.

I might actually manage to do work I want to do not work I have to do now the bench is clear? o_Oo_Oo_O

Kind regards, Colin.

Cill installed_0001.JPG


Not the best sealant job but done in a panic; it will be painted assuming the weather ever permits. I touched in the screw head covers with paint but they are still ugly; it won't stop raining long enough for me to make a better job; perhaps next year?

Free tools._0002.JPG


We've suffered high wind for a few days so high it blew over our neighbours hut. I was happy to help because our neighbour lives on her own and is about to move home; I repaired the hut nailing the back panel back in place and once it was back in position our neighbour asked if I'd like any of tools inside the hut which was generous of her; I accepted two hammers and a small axe with thanks. The picture shows the three tools where I've started to restore them. All were rusty.
.
Free tools._0003.JPG


After a bit more fettling I'll blow over with paint and they'll be good as new again.
 
Last edited:
Joined
Jul 29, 2018
Messages
800
Reaction score
531
Location
Huddersfield. UK.
Country
United Kingdom
Hi,

The three tools I was kindly given are now ready for service once again. A bit of TLC works wonders.

Kind regards, Colin.

Free tools_0001.JPG


Rattle can primer.

Free tools_0002.JPG


Rattle can gloss. These will now be better cared for in my workshop.
 
Joined
Jul 29, 2018
Messages
800
Reaction score
531
Location
Huddersfield. UK.
Country
United Kingdom
Hi,

I couldn't stand the ugly screw head covers any longer shown in the picture post #12 so they are now history; it's taken days to get rid of them due to our wet climate but the screws are now countersunk and covered with flexible sealant then painted; I'm a lot happier now the porch weather proofing is finally completed ready for winter.

Kind regards, Colin.

Porch Nov 2020_0001.JPG


New framed panels and cill fully installed and finished off looking a lot better; rain and wind will have to fight a lot harder to get through these. No sooner had I gone out with the camera than it started to rain again.
 
Joined
Jul 29, 2018
Messages
800
Reaction score
531
Location
Huddersfield. UK.
Country
United Kingdom
Hi,

I'm giddy with excitement spending time in the workshop at last.

I'd like to do more woodturning this winter and have been playing around on the lathes. A few days ago I pulled some turning blanks from the bench and set about turning a finial lidded box out of what looked like interesting timber. I roughed out the base but wasn't impressed by the cracks and voids although it was fun to be making shavings again; the lid though was a disaster; as I opened the blank up a large hole appeared and not wishing to wear this if it exploded gave up and junked it; the base was then turned into a small bowl; I was going to junk the bowl too after all I was only pottering around getting used to the lathe again; when my wife saw the bowl she liked it so it's now sitting on our mantle. I've got a good stock of woodturning blanks so I can do better.

Bowl Nov 2020_0001.JPG


The small bowl; a bit chunky but given the condition of the blank I daren't turn it thin; I enjoyed turning it so nothing is lost.

Bowl Nov 2020_0003.JPG


Here are the two blanks; the one on the left is the finished bowl shown above the one on the right which I hope to make into a lid was too poor and unstable; I did try using auto body filler on some of the cracks/voids before turning but this filler quickly dulled the tool tips; there are many YouTube videos showing much worse blanks being encased in resin and they look very impressive indeed but the high cost of such resin here in the UK puts me off using it; in the early 70's I was an experienced glass fiber laminator where I would be on production catalyzing 5 gallon of resin at a time but buying small quantities of resin is highly expensive together with catalyst and pigments etc. The company I worked for closed years ago otherwise I'd have popped in for some resin.

I've been making a pair of TC tipped woodturning tools over the last two days and have just completed them; I had suitable sized oak in stock for the handles also plenty of 1/2" dia BMS (Bright mild steel) bar stock plus the TC tips so it was just a case of enjoying putting them together.

Tool handles_0001.JPG


I didn't have suitable brass tubing for ferrules but I did have heavy gauge steel pipe so I cut three ferrules and tidied the bores on the Lorch lathe to remove the weld and bring all three to the same internal diameter; I wasn't bothered about opening to an exact diameter as long as all were the same; the handles would be easy to trim.

Tool handles_0005.JPG


Here the lathe is under power as I apply the finish to one of the handles.

Tool handles_0006.JPG


Here are the two handles with wire burnt decoration rings; I used a digital vernier caliper to measure accurately adding 30 thou (0.03") to the turned ferrule sections ensuring a very tight fit indeed; a club hammer was used to drive the ferrules home; the ferrules were hand tapered at their end using a round file this end towards the handle; I could have added the taper whilst the ferrules were in the lathe but dinner time was rapidly approaching.

Spinning tools_0001_01.JPG


The 1/2" dia holes being drilled in the lathe ensuring accurate axis alignment; a pilot hole was drilled first; the handle tends to rattle around a bit until the drill buries its nose then it settles down; preventing the handle from spinning by grasping it with my left hand whilst my right hand applies the feed to the tailstock; this is the easiest way I have of ensuring the tools aren't misaligned which is so easy to do if drilling free hand.

Spinning tools_0003.JPG


I only intended to make two new tools but made a spare ferrule; the two tools have their tips secured with Torx machine screws the bar ends having been drilled and tapped; the third tool still to complete but for this one I decided to braze the pointed tip into position; I'll turn a new handle shortly. Oak isn't the best timber for tool handles due to it's open grain but I already had the oak so used it. Beech is a better choice.

It's nice not to be under any pressure with a list of must do jobs; they're all done so I'm free to potter around and I'm making the most of it.

Just passing a bit of time having knocked off for dinner but a most enjoyable morning with something to show for it.

Kind regards, Colin.
 
Joined
Jul 11, 2020
Messages
92
Reaction score
41
Location
Yarm, UK
Country
United Kingdom
Wow! At last you've got some 'me time'. Excellent work on those tools. The drilling while supporting the work piece with your left hand is a good idea, but maybe HSE would frown on? :eek:

Colin
 
Joined
Jul 29, 2018
Messages
800
Reaction score
531
Location
Huddersfield. UK.
Country
United Kingdom
Hi,

Thanks Colin. Yes the HSE lot would close my workshop down. Preventing the handle turning by using my left hand is plenty safe enough for me; I'm well aware of the dangers but grasp the handle in such a way it can break free of my grip and simply rotate between centers so I won't get hurt. Maximum drill diameter is never bigger than 1/2" and the handles are always very smooth so no risk of lacerations or splinters.

My wife and I watched the following video during dinner a short while ago and I cringed as I watched this guy add burned rings with a wire; it can be seen from around 8:41; has he wrapped the wire around his fingers?


My burning wire is fitted with a pair of wooden handles which I strictly use.

Kind regards, Colin.
 
Joined
Jul 11, 2020
Messages
92
Reaction score
41
Location
Yarm, UK
Country
United Kingdom
His burning wire appears to have preformed rings at the end, the sort that go round wooden handles. Maybe the handles broke and he can't be bothered to replace them. Much easier than sewing fingers back on!

The tool rest seems to move quite a bit too, more than you would normally expect even with a heavy cut.

At least he left the riving knife on his circular saw when cutting on the diagonals.

We all have our own methods, but I do favour having the same number of fingers that I started with. ;)

Colin
shhh-ive-got-6ac9380a4c.jpg
 
Joined
Jul 29, 2018
Messages
800
Reaction score
531
Location
Huddersfield. UK.
Country
United Kingdom
Hi,

I couldn't agree with you more Colin; it's always good to retain fingers still attached to hands after a job.

Today has been a very special day for me; all day in the workshop without interruptions of any kind; just wonderful and what retirement should be like; I could get used to every day being like today.

I watch lots of YouTube videos and for a while have fancied having a go at turning a wooden goblet so finally got around to it today.

Kind regards, Colin W.

Goblet_0001.JPG


The first ever goblet I've ever attempted to turn; here it is completed ready to part off.

Goblet_0002.JPG


A tennis ball for tailstock support; light cuts are needed otherwise its easy to destroy the work.

Goblet_0003.JPG


The finished goblet which turned out well in the end.

Holly goblet._0002.JPG


Here's the goblet being just a thought in my head; a length of local holly tree; I like turning holly because it's dense and gives a good finish.

Holly goblet._0003.JPG


Roughing the goblet between centers adding an end tenon for mounting in the chuck.

Holly goblet._0006.JPG


The cup end finish turned and finish applied; Yorkshire grit and Hampshire Sheen is the finish. If only every day was as good. I did the supermarket shopping and was back home by 8 o'clock this morning keen to get into the workshop. My lovely wife is always highly supportive encouraging me in my hobbies as I encourage her too; she's already found a home for this goblet so on to the next project.
:):):)

Goblet.jpg


Here's the inspiration I worked from finding this on Pinterest; at the moment I can only aspire to such high quality but I'm more than happy to try. Top marks to the guy who turned this goblet.
 
Joined
Jul 11, 2020
Messages
92
Reaction score
41
Location
Yarm, UK
Country
United Kingdom
That's an excellent piece of work, including the tennis ball idea. The original piece of stock looks a bit like a bone that our dog left out in the garden for a few months!

I still haven't got my workshop sorted as the revision surgery on my knee replacement has been postponed again. So, idle hands need to be kept busy and I turned to an old hobby, model making. The objective is to model the sort of forest hide that air force Harrier jets used to hide in over in Germany during the late 80s.
wp07b94dfc_05_06.jpg

First a refuelling tanker (70mm long as a model).

That took 17 days and has 68 pieces. Painting took over half that time too.

harriergr3pds_5.jpg

The Harrier, 15mm long nose to tail.
harriergr3pds_8.jpg

Held by yours truly to put scale into perspective.

That took 46 days to complete. Now I need to build the diorama base board with hard standings and pine trees as well as additional vehicles.

At least I can work at my desk in the warm, yesterday evening temperatures in the workshop being 4C, and out in the open 'feels like' -1C. You are well served, having your workshop under the bungalow and heated by the Intergas boiler and radiator.

Anyway, must get back to my tiny vehicles.

Colin A
 

Ask a Question

Want to reply to this thread or ask your own question?

You'll need to choose a username for the site, which only take a couple of moments. After that, you can post your question and our members will help you out.

Ask a Question

Top