Hi,
WOW; only a year old and in such poor condition.

Doug's Formica suggestion is excellent but I always find edges difficult due to the Formica joint showing although I've not watched any YouTube videos on the subject so I bow to your greater experience Doug.
Is the table top veneered with real veneer or is it simply embossed with a wood looking paper or is it solid wood; knowing what the top is made of can make a lot of difference to choice as to how to restore it.
If it's real wood veneer or solid wood then the finish can be completely stripped either chemically with paint stripper or using a very sharp cabinet scraper; if it's wood veneer though care is needed not to go right through the veneer to the substrate; modern wood veneer can be as thin as 0.6mm so power sanding must be avoided or it will end in tears. Solid wood is best and this can be power sanded taking relevant safety measures against harmful dust.
Laying Formica looks easy but is actually very difficult for a novice especially on a project of this size; I used beautiful formica when I made my oak desk and it looks impressive; I've also done lots of other jobs involving veneer and solid wood; if this table top can be stripped of its original finish then stained I would recommend readily available polyurethane varnish as the new finish and this can be in either gloss or matt; I prefer matt otherwise the finish can look like a toffee apple. Polyurethane varnish if applied correctly is an excellent finish for a table top because it's so tough.
A lot comes down to experience because finishing is a big world in its own right and the selection of finishing materials is truly bewildering to a novice also preparation too involves skill.
Just a few ideas but because of your inexperience regarding painting I would suggest a lot of practice on smaller projects before tackling this big table top.
Good luck.
Kind regards, Colin.
View attachment 1929
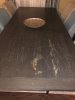
Here is a damaged table top where our neighbour was highly distressed having spilled nail varnish remover on it the damage right through the finish to bare wood; this table is solid wood and one of a nest of three coffee tables; the tables have a long family connection being handed down.
View attachment 1931
Because the top is solid wood I could resort to drastic removal of the finish using my Stanley #80 cabinet scraper; with the scraper razor sharp it made quick work of stripping the original finish.
View attachment 1932
Completely stripped and sanded to 240 grit ready for staining. This is not a job for a novice especially on a family heirloom such as this.
View attachment 1930
Restoration completed; matching stain allowed to completely dry then two coats of matt polyurethane; I've had a lot of practice though. Result one very happy neighbour.
View attachment 1935
My home made desk under construction.
View attachment 1934
Door detail and bespoke wood turned knobs with Formica inserts.
View attachment 1933
Desktop awaiting the oak finishing in matt polyurethane. This is the front with three drawers in place but drawers requiring knobs; to the back it's recessed to accept seven single 13 amp power sockets these my idea of tidying all the computer cables.
View attachment 1936
The desk nearing completion still requiring the right hand door and knobs to be installed; the pictures don't do it justice but I hope it demonstrates what a good idea Doug suggested in using Formica; everyone who sees the desk thinks it is burr veneer; I managed to hide the Formica edges by design but I'd encourage anyone to have a go at such work because it's so highly satisfying; the solid timber is English Oak the Formica is laid on 18mm thick MDF using contact adhesive; the desk is heavy and the polyurethane finish is still excellent after years of use. The left hand pedestal is left open having no door for computer ventilation. I enjoy this kind of project but when I left school in 1962 I hated wood working.
 154.6 KB Views: 236
