Chuck fell off spindle on drill press

Joined
Dec 31, 2018
Messages
5
Reaction score
4
I have an older drill press, a bench top type. It has been working just fine until the chuck assembly just fell off the rotating shaft. There is no threaded end or set screws. Just a smooth shaft. Can I just tack weld it back, or is there a less redneck way to do it. Thank you in advance
 
Joined
Jul 29, 2018
Messages
799
Reaction score
531
Location
Huddersfield. UK.
Country
United Kingdom
Hi,

C'mon Rockport Ray; welding a chuck on tut;tut. :(

How was the chuck attached before it fell off; my big drill press and lathes have "Morse" tapers; Jacobs type chucks and machine drills simply are secured by the taper. Pictures would be useful because I'm very interested in such things?

It's your machine of course but I wouldn't resort to welding. You say the rotating shaft (quill) is just smooth; below is a picture of a morse taper arbor; the end with the tang pushes up into the end of the quill this being tapered also the shorter end which too is tapered pushes into the chuck; there are a number of types of taper; without pictures though I can only guess as to the chuck mounting on your drill press and assume the quill is tapered?

Welcome to the forum and a Happy New Year.

Kind regards, Colin.

upload_2018-12-31_11-20-4.png
 
Joined
Nov 13, 2018
Messages
515
Reaction score
279
Location
Warrenton, North Carolina USA
Colin is absolutely right. NO WELDING. I have had this problem in the past and the remedy is quick and easy. Clean the tapered shaft and the hole it goes in completely. Use rubbing alcohol to remove any grease or particals. Back the jaws completely inside the chuck. Insert the chuck completely inside the shaft hole being careful to align the key way if there is one. Put a block of wood on the work table and bring the chuck firmly on the wood. Apply pressure on the wood and GENTLY tap the chuck all around with another piece of wood. You should then be ready to go.
 
Joined
Dec 31, 2018
Messages
5
Reaction score
4
Thanks all. First of all, I really appreciate the help. I was only half joking about welding. I would imagine it could set up vibration issues that get worse with more speed. Also, if it is not aligned correctly, there will be no way to drill straight and precisevever again, making it a great boat anchor. I will try to get pictures today. Secondly, thanks for the wrm welcome and Happy New Year to ya'll as well.
 
Joined
Jul 29, 2018
Messages
799
Reaction score
531
Location
Huddersfield. UK.
Country
United Kingdom
Hi,

Excellent information Doug. :):):)

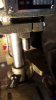
Without the pictures I could only guess as to what had actually detached from the quill. The pictures though clarify what has happened. The chuck body has detached from its arbor leaving just the short taper shown in #2 still located in the quill. This is unusual because in over 50 years this has never happened to me; it's always been the long taper with the tang that has detached from the quill together with the chuck body but no problem at all to fix following Doug's information regarding cleaning and refitting.


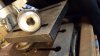
Above is a link to a YouTube video which explains and shows in more detail the removal of such a chuck; the only thing I disagree with on the video is using a length of timber and hammer to strike the chuck at an angle to remove it; if the chuck is very tight then there is possible risk of damage also as in this case the chuck body alone might be removed leaving the arbor still inside the quill; I only use a proper "drift" in the slot provided; if there isn't a slot then a fork type wedges should be used.

https://www.instructables.com/id/Wedges-for-Drill-Chuck-Removal/

I've only ever used drifts to remove these chucks with no damage to the arbor or drill press;

https://www.mscdirect.com/product/details/97032726

A drift is very easy and quick to make compared to a pair of wedges although drifts are cheap enough to buy. :)

I often remove the chuck because my drill press is a floor standing industrial heavy duty type fitted with a back gear to bring the rev down to around 60rpm; I have dozens of these drill bits which insert into the quill; the smaller sizes need correct morse taper sleeves;

https://sheffieldtooling.co.uk/prod...uemk_roDk1UaFfR9cig1ESQLFP3fg_6gaApcBEALw_wcB

I also use these drill bits in my lathes; for small diameter holes I usually use standard parallel drill bits mounted in a Jacobs chuck.

Here are the sleeves;

https://www.amazon.co.uk/Proops-Morse-Taper-Sleeves-Postage/dp/B00LVWCXQA

I'd like to add to Dougs information regarding cleanliness; over the years chucks and drill bits tend to gather a few nicks and dents on their mounting surface; these need removing very carefully with a fine engineers file otherwise seating will seriously be impaired. Just for interest these dents can actually be used to advantage; many times I've encountered a shaft where the bearing mounting has been slightly loose so I've used a knurling tool to add a shallow diamond pattern; this takes practice and skill because knurling too deeply will prevent the bearing going on. My knurling tools are the swivel type but here is the scissor type which is gentler especially on a small low powered lathe;


I'm sure Doug and I could go on forever regarding workshop practices but hopefully you'll now understand why your chuck detached and be able to reattach it costing nothing.

Kind regards, Colin.
 
Joined
Jul 29, 2018
Messages
799
Reaction score
531
Location
Huddersfield. UK.
Country
United Kingdom
Hi,

I'd better add a safety note for all novices; never ever wrap anything like cloth or abrasive paper around finger or hand whilst working on anything revolving under power; it's tempting and looks like a very easy way of cleaning out an internal taper or bore but it's equally as easy to cause serious permanent injury. This was the very first safety advice I was given 55 years ago whilst being introduced to a big industrial metal turning lathe.

Kind regards, Colin.
 
Joined
Nov 13, 2018
Messages
515
Reaction score
279
Location
Warrenton, North Carolina USA
Hi,

I'd better add a safety note for all novices; never ever wrap anything like cloth or abrasive paper around finger or hand whilst working on anything revolving under power; it's tempting and looks like a very easy way of cleaning out an internal taper or bore but it's equally as easy to cause serious permanent injury. This was the very first safety advice I was given 55 years ago whilst being introduced to a big industrial metal turning lathe.

Kind regards, Colin.

Body parts being removed at a high rate of speed can take much of the fun out of a DIY project.
 
Joined
Dec 31, 2018
Messages
5
Reaction score
4
Good news/bad news. Good news is, I believe I can fix this issue. Bad news is, now you've taken away an excuse to buy a bigger one. Oh well, I shall find a way to muddle through, ha! Thank you both kindly for your help and have a happy new year!
 
Joined
Dec 31, 2018
Messages
5
Reaction score
4
To my new friends Retired (Colin) and Silent Running (doug), thanks for your help. I cleaned the spindle and the chuck thoroughly, fit them back together as per your instructions, and ta-da! Works as advertised. Took me awhile to get to it, and another little while to post this response. Many thanks!
Ray
 
Joined
Jul 29, 2018
Messages
799
Reaction score
531
Location
Huddersfield. UK.
Country
United Kingdom
Hi,

Thanks for the update Ray and you're most welcome. :)

Everything is easy once the answer is known; you did the right thing to ask.

Kind regards, Colin.
 

Ask a Question

Want to reply to this thread or ask your own question?

You'll need to choose a username for the site, which only take a couple of moments. After that, you can post your question and our members will help you out.

Ask a Question

Top