Radiator plumbing change for towel rail

Joined
Aug 19, 2019
Messages
101
Reaction score
14
Country
United Kingdom
Hi
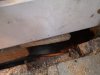
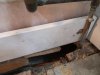
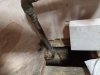
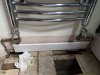
I installed a towel rail in place of the radiator a few years ago and made a bit of a mess of the plumbing as there were tiles laid on the floor. Now we are doing work in the bathroom and the floor is up so I have decided to have a go at tidying the plumbing up. However this does not look as easy as first thought. The plumbing under floor is 10mm copper and will need bending to get in position. There is not a lot of room as it is behind the floor joist. Any ideas of best way to proceed? I am a bit worried of kinking the pipes if attempting to bend them I have a spring but access isn't good
Cheers
Dave
 

Attachments

Joined
Sep 15, 2018
Messages
572
Reaction score
279
Location
South Manchester
That does look a bit of a mess.

Presumably you want the pipes to come straight down from the towel rail?

I'd want to get at a straight bit of that pipe to the left at the edge of the picture.


I'll explain it as if you know little about plumbing, it's easier that way.

What you need is a pipe cutter.

zcrp0001-zn.jpg


These are easy to use you just wind it round the pipe, but it only works on straight pipes. You need to clean the ends of the cut bits of pipe in a circular manner with some wire wool .
You need to turn off the central heating and also turn off the two valves at the bottom of the radiator. I'd also turn off any other radiators on that floor or any floor above, at both ends, Also use some old towels to place under the bits you are going to cut as there will be some water.

If you aren't familiar with soldered joints I'd suggest you use compression fittings. Take your photos to a plumbers wholesaler, "ask for some professional advice" (they'll love that) and they'll tell you which you need and how to do it, they'll also sell you a cutter and a length of pipe.

If you can get at it, use one connector to join up the pipe we can see coming from the left. You'll need a different connector to be under the left hand valve of the radiator forming a right angle and another length of pipe up to connect to it . A different connector will be required to join it to the radiator.
The pipe that connects to the right valve looks a bit like a snake. I'd replace it and connect it in the same way as the left one. Connect everything up, but don't tighten anything more than finger tight until you are sure all the pipes are fully into the connectors. So you can check that the pipes down from the radiators are straight. With the cutter you can trim off very short bits of pipe if necessary.

You'll need two spanners to tighten up each connector.

Once you're sure you've tightened up all the joints fully . Turn the heating back on. Then both valves of the radiator. Then the other radiators on that floor. You'll probably need to bleed all the radiators and the towel rail.

An alternative way of doing all this is with Speedfit plastic pipes, but I don't like using them indoors.
 
Joined
Aug 19, 2019
Messages
101
Reaction score
14
Country
United Kingdom
Hi
Thanks for the reply. I am okay with soldering etc but as you can see the access to the pipes is very poor. I ideally would like to cut the 10mm pipe just below the 15mm and then straighten out the one on the left and join another 10mm section to reach the valve. The pipe on the right I think needs cutting off and straightening so it lines up with the radiator valve. I am a bit concerned that attempts to straighten could kink the pipe further down where I cannot get access to it. I have an external straightening spring but not sure if this will be use able in this tight space. I cannot access from the other side due to the flooring.
Cheers
Dave
 
Joined
Sep 15, 2018
Messages
572
Reaction score
279
Location
South Manchester
Hi
Thanks for the reply. I am okay with soldering etc but as you can see the access to the pipes is very poor. I ideally would like to cut the 10mm pipe just below the 15mm and then straighten out the one on the left and join another 10mm section to reach the valve. The pipe on the right I think needs cutting off and straightening so it lines up with the radiator valve. I am a bit concerned that attempts to straighten could kink the pipe further down where I cannot get access to it. I have an external straightening spring but not sure if this will be use able in this tight space. I cannot access from the other side due to the flooring.
Cheers
Dave
The problem with straightening pipes with a spring in a confined space as you say will be difficult, as you need quite a bit of purchase on the pipe and it's even harder when it's short.
You could use a bit of speedfit pipe. I did use it to connect up a new vanity unit in our bathroom as the space was very confined.
 
  • Like
Reactions: Ian
Joined
Aug 19, 2019
Messages
101
Reaction score
14
Country
United Kingdom
Hi
I am still working my way up to tackling this problem. I am hoping to sort it on Saturday and will let you know what I finally did. I am going to cut the 2 x 10mm pipes off and initially see if I can straighten them out with an external spring bender. I think the one on the RHS will be easier as it has more slack where it bends round. I think the one on the left may need a section of 10mm joined to it as I don't think it will quite reach the valve. However, I am not sure if I will need to bend the pipe after joining it, if I do I will need to be careful that I don't weaken the soldered joint.

I have a plan if this does prove to be a non-starter. There are 2 x 10mm pipes running from the boiler downstairs but don't know where they go to directly. I do know that they are heating pipes as I have checked when I fire the boiler up. I will if it comes to it 'T' into these and run new piping to the radiator and cap off the existing stubs. I do see this as a last resort as I have heard that these can be hard to solder due to evacuating the water sufficiently for soldering

Are you in a similar situation? If so let me know some details? I will post what I have done when I finally get there
Cheers
Dave
 
Joined
Aug 19, 2019
Messages
101
Reaction score
14
Country
United Kingdom
Hi
I finally got round to tackling this and it turned out to be a lot easier than I first thought. I cut the 2 x 10mm pipes just below the point where they connected to the 15mm pipes. Then I managed to get the external spring bender on. The left hand side pipe was just long enough but I couldn't get a 90 degree bend near the end so I used an elbow joint and a short section to join to the 10 to 15mm adaptor. I connected it all together and then soldered. I used solder ring so I could be sure to get a good joint given access was poor. The right hand side was easier as I pipe work was longer and I managed this side without needing to use a elbow.

Sadly my old Ronson high heat butane blow torch finally ran out of gas and this is no longer available thus I had to use a Rothenberg that I recently purchased but this is a beast to use control of the flame is near impossible also you cannot angle it as the flame then goes wild. I have attached some pictures of the work
Cheers
Dave
IMG_20191019_144117.jpg
IMG_20191019_144122.jpg
IMG_20191019_153241.jpg
IMG_20191019_145827.jpg
IMG_20191019_153227.jpg
 
Joined
Sep 15, 2018
Messages
572
Reaction score
279
Location
South Manchester
Well done!

A professional looking job.

After finishing a project like this you often why you were worrying about it before. When you know what needs doing it just needs the confidence to just get on and do it.
 
Joined
Aug 19, 2019
Messages
101
Reaction score
14
Country
United Kingdom
Thanks! and also thanks for your assistance. I just need to get the rest of the bathroom sorted now. The shower was an ordeal to install along with the waterproof wall boarding and skew walls to deal with, you would think they could get a plaster board stud wall straight
Cheers
Dave
 
Joined
Sep 15, 2018
Messages
572
Reaction score
279
Location
South Manchester
I quite enjoyed putting our bathroom in fifteen years ago. I even tiled the bath panel.

Bathroom 1.JPG


Bathroom 2.JPG


But seven years ago my wife said she would prefer a walk in shower and new units.

So I "got a man in." I wasn't doing it twice. Fortunately I was able to give him the extra tiles I'd saved to tile aaround where the bath had been, in case this change became necessary.

P1010489.JPG


P1010488.JPG
 

Ask a Question

Want to reply to this thread or ask your own question?

You'll need to choose a username for the site, which only take a couple of moments. After that, you can post your question and our members will help you out.

Ask a Question

Top